I made some videos explaining how to pin tricky pattern pieces that don’t seem to line up at first. This technique is used in several of my patterns, including the arm/leg seams in my Baby Fox pattern and Lion Cub pattern. I hope my tips and techniques in this video are helpful for you!
How to applique faces on minky
If you don’t have an embroidery machine, you can still make gorgeous eyes on your plush using the applique method on your sewing machine! You can use this technique to easily add cute faces to your Cat Roll plush: Materials needed: Sewing machine, ballpoint/stretch needle, non-fraying fabric such as felt or suede (or use “fray check” on fraying/shredding fabric), tear-away interfacing (I like to use
How to make a rotating plush head
Learn how to make your animal plush have a turning head using plastic safety joints! Materials needed: Safety joint set a bit smaller than the diameter of the neck piece (just subtract seam allowance) – this should be 3 pieces: one stem, one washer, and one connector. If you are using my Chibi Lion pattern, 40-45mm) One plush head and body. The body should have
Plastic and glass eyes secrets
Hey plush artists! In this tutorial, I’ll be going over different kinds of plastic and glass eyes used in plushmaking. Should you use glass or plastic eyes for your project? Plastic eyes + Cheap + Lightweight + Safe for children 3+ – Inconsistent quality (find a good supplier) – Sometimes have different height Glass eyes + Handmade and high quality + Wire loop allows instant
Adding cheek blush to plush faces
Here’s an in-depth tutorial using 2 methods for how to add cute blushing cheeks on your plush faces! Method one: Chalk pastels (or soft pastels) This method is not permanent, and should not be used for plush that are going to be washed. Step 1: Prepare materials Chalk pastels/soft pastels (never use oil!), paper, brush, scrap fabric of the same color of your plush. Step
Thread sculpting plush faces
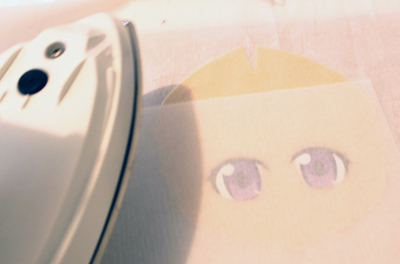
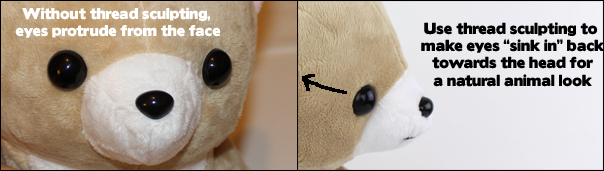
Here’s a quick thread sculpting tutorial, as featured in my Newborn Fox plushie sewing pattern ~ You can add dimension to the face by using thread to manipulate the shape of the face. I will be thread sculpting (also called needle sculpting) the eye sockets to pull the eyes back into the head a bit. This will give a very natural look to the face.
How to edit photos in Photoshop
Here’s a simple tutorial on how to use Photoshop CS2 to make your plushie pictures look much, much nicer :) Adobe offers a free download available here – and here’s a Gizmodo article on it Adjusting Levels To make your picture’s white spots whiter and light spots lighter (in equal levels). Image > Adjustments > Levels Move the tiny slider on the far right (looks
How to fix pointy darts
In this tutorial, I will show you how to make a pointy dart smoother if you’ve already sewn and stuffed your plush. In my last tutorial, I covered how to sew darts smoothly by machine so that you achieve a fine curve. You will need a handsewing needle, thread, and scissors. Thread conditioner is helpful! Start your needle at the top of the seam (on
Plush iron-on eye tutorial
Materials needed: Printer, ink, regular paper, dark fabric iron-on transfer sheets, iron Step 1: Test print eyes and make adjustments You should not need to mirror your image before printing. Print a test sheet on regular paper, standard or high print quality. For me, the eyes print darker ink than shown on my computer. You can use photo editing software to adjust the hue and
Plushie eye painting tutorial
Materials needed: Acrylic paint, textile medium, small brush, plastic palette, cup of water, chalk/pen Step 1: Set up your surface with newspaper underneath, as paint can stain through fabric onto your table. Put your colors on your palette, and mix colors as necessary to achieve correct eye / eyebrow colors. Add a small bit of textile medium to each color. Step 2: Use your pattern
- « Previous Page
- 1
- …
- 4
- 5
- 6
- 7
- 8
- 9
- Next Page »