
Thread breaking? Bottom thread coming to top?
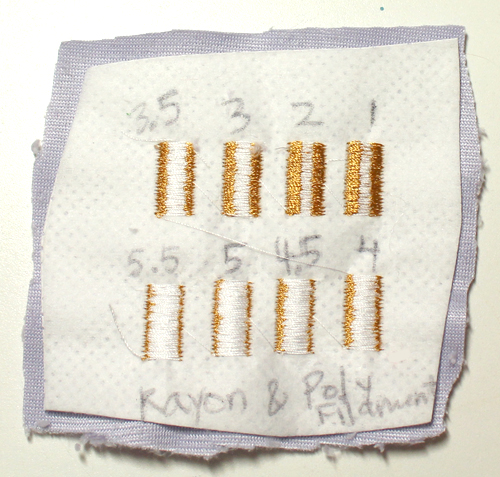
- Check that tensions are correct. I did this with minky, stabilizer, and made a 1cm wide satin stitch test file. (Free download for the satin stitch test file is here, in JEF, PES, DST and HUS format) With each new satin stitch, I rotated the top thread tension by 1/2. On the underside, the bobbin thread column should be about one-third the width of the satin-stitch column for perfect tension. So for my test swatch, the top tension at “3” is perfect. Your tension will vary by machine, the thread type, and fabric/stabilizer combination.
- Make sure bobbin is correct size
- Make sure machine is clean and screws are back in properly
- Make sure threading is correct – BOTH top thread and bottom bobbin
- Make sure top thread can feed from spool without obstruction; use a standalone thread holder with a disc top or thread net
- Check for burrs on the needle; change needle
- Clean tension discs
- Use less stabilizer
- Try a different spool of top thread
- Try a different brand of thread
- Try putting thread in the freezer (thread may be dried out)
- Switch to polyester thread
- Try a different bottom bobbin thread
- Check if there’s a problem with the design – it may be too dense, or not have enough underlay
- See a doctor (bring your machine into a sewing professional that has experience with your machine’s brand)
Bird’s nest (loops of thread) under fabric?
- Check that machine is properly threaded
- Brush out lint from tension discs
- Cut thread at the spool instead of at the needle, and pull thread down, instead of up again through the machine
- Don’t pull thread backwards through machine as it can cause lint buildup in tension discs
- Clean inside and around bottom bobbin case
- http://blog.colmanandcompany.com/embroidery-birdnesting-tips/
- http://www.annaboveembroidery.com/trinmaem.html
Is your fabric shifting? Is there gapping?
Is your design puckering?
- Make sure the design has adequate underlay to support the design’s heavy fill stitches
- Choose a design that is less dense for the fabric’s weave; or a stronger fabric for the dense design
- Use temporary fusible spray to adhere back of fabric to interfacing
- Use Rayon thread instead of Polyester
- Use the smallest hoop possible to fit the design
- Add a more stable backing
- Lay the interfacing and fabric over the bottom hoop, then gently press the top hoop in place
- Instead of traditional hooping, just hoop the interfacing, and use a temporary fusible spray to adhere wrong side of fabric to the interfacing
- Check that the top and bottom threads are correctly threaded
- Check tension balance
- After embroidering, set your iron to the lowest setting, and press on the back on the embroidery for 10 seconds through a press cloth